1. Access Rights
The facilities described in this paper are only available to users with the Role of Administrator. If you need to update the website and are not currently an Administrator, ask an existing Administrator to give you Administrator rights.
2. Changing Website Content
Being a WordPress site, the content (ie the text on the web pages) is fairly easy to change:
- Firstly visit the site: vrg.org.au.
- Navigate to the Login page (Members -> Login) and enter your normal credentials (username and password).
- Go to the dashboard by moving the mouse over Victorian Recorder Guild in the top left-hand corner of the screen and then click on Dashboard.
- Click on Pages in the left-hand side panel, and then move the mouse pointer over the page that you want to change and click on the Edit link that appears below.
- Changing the text is very similar to work on a Microsoft Word document:
- Click on the point that you want to change and then start typing to insert text or, to delete text, select the text to be deleted and press the Delete key.
- When you have finished, click the Update button near the top right corner of the screen.
- To see your changes, click on the View Page link, near the top left of the screen.
3. Adding Users
Users are now WordPress users. Follow steps 1-3 in Changing Website Content above and then click on Users in the sidebar and then click Add New. Fill in the details of the new user and then click the Add New User button. For Username use their email address up to but not including the “@” sign. Up to 1/12/2025, the initial password is the same as the user name. After 1/12/2025, the password is Signin2VRG! for all new or updated users. The Role should be Subscriber except for users with special access.
You will also need to send an email to each new user, which is done as follows:
- Make sure you are logged in as “admin”, not your personal account. (This ensures that the email has the correct From: field.)
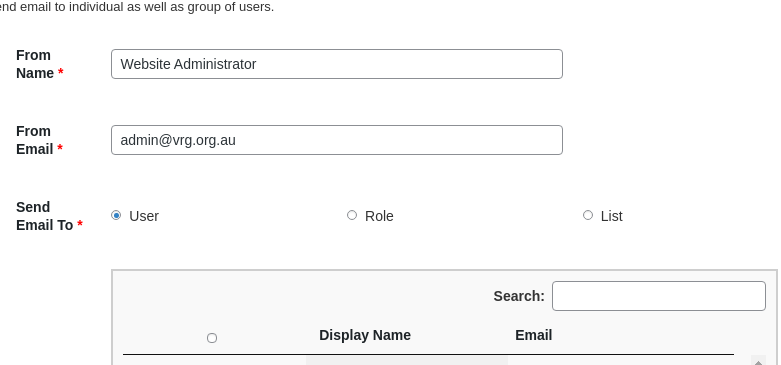
- From the dashboard access: WP Email Users -> Send Email
- Enter (some of) the user’s name in the Search box (see partial screenshot 1, above).
- In the list of matching users below, check the checkbox beside the new user you want.
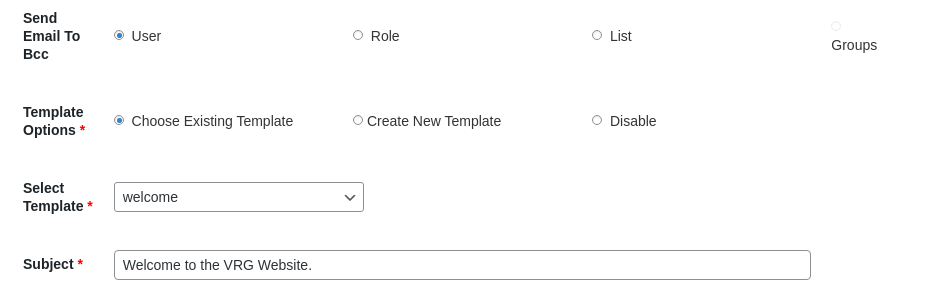
- Choose Choose Existing Template for Template Options and select welcome from dropdown list for Select Template. (See partial screenshot 2, below).
- Click Send button at bottom of screen.
4. Updating Tables (Events and Library)
Note this is just the beginning of notes about how to manage the web site.
Visit vrg.org.au/cpanel.
Username: vrgorg00
Password: cb3x6edftk
Click Login to take you to the cPanel Home Page (shown below).

In the DATABASES section, click on phpMyAdmin, which will show the following screen:
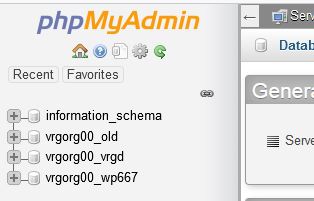
You will see that there are three databases (apart from information_schema, which is an internal database that should not be touched):
- vrgorg00_old, which contains our data tables prior to moving to a new host in August 2022.
- vrgorg00_vrgd, which contains our data tables, which we can maintain as described in the sections that follow.
- vrgorg00_wp667, which belongs to WordPress and should not be touched.
4.1. Updating the activities table (Events)
Open up the vrgorg00_vrgd database by clicking on it. The activities table, which is now revealed, is used by both the Upcoming Events (events happening today or after today) and Past Events (events that happened before today).
Select activities from the menu tree in the left sidebar and the data will be displayed.
To enter a new event, select the Insert tab, the fifth tab across the top of the main window and fill in the boxes following the pattern shown in the screenshot below. For events that cover several days, enter the start date in the date box and “00:00” in the time box.

Notes:
- The id box is always left blank.
- Select the date by clicking on the calendar icon under the event title box. Note that the date is vital because it determines whether the event is shown as Upcoming Events or Past Events depending upon the date the website is viewed. For events covering several days, enter the start date.
- Enter the time in the format hh:mm (where hh is the hour in the 24-hour clock) and mm is the minutes). For events covering several days, enter the start time on the first day of the event or “00:00” if not know or not relevant.
- Enter the title of the event in the next box below.
- Enter the event description in the next box below. It is not normally necessary to enter date and time except for multiple-day events where the finishing day and time is not otherwise recorded.
When complete, click Go.
To check that you have entered the event correctly, click the Browse tab. It is often useful to click on the date heading to reverse the order in which records are displayed with the most recent appearing at the top (as shown in the screenshot below.

Existing events can be edited or deleted by selecting the appropriate icon.
4.2. Updating the musiclibrary table
The musiclibrary table can be updated using the method described above, but normally this will be uploaded from a spreadsheet by the website administrator.
The VRG library runs an independent system developed by Tudor Holton tudor@tudorholton.com . Periodically (every 3 months or so) the library database should be downloaded from http://library.tudorholton.com/ as a .csv file, and uploaded to this (the VRG) website. Open up the vrgorg00_vrgd database by clicking on it. Click on musiclibrary. Choose Import, Choose File, and select the .csv file from wherever you downloaded it to. Click Import at bottom of page.
This can also be done by the VRG’s website consultants – Greengraphics (Nathan Gearing nathan@greengraphics.com.au 03-5472 5300).
To log on to Tudor’s website use User name “greengraphics” and password “QW~K0WUXZehe”.
4.3. Updating the teachers list
The list of teachers is held in public_html/wp-content/uploads/1-Teachers-2019-02-14.csv.
Download the list, edit it using Excel or similar, and upload the new version with the same file name, to the same location.